Friday, June 26, 2009

Saturday Sketch Challenge ~ 105

All of the operators are VERY excited about this weeks sketch challenge! That's because we're giving an extra special prize to one lucky participant this week!

This isn't your typical blog candy contest... Oh no, this week, one person who plays along with the operators will receive ALL of our samples this week in their mailbox!!! How fun is that?

Get excited kids! This one is one you'll want to play along with!

This is a super simple sketch and I think you'll find it really easy to make your own creation.

Here are some measurements for you to try out:

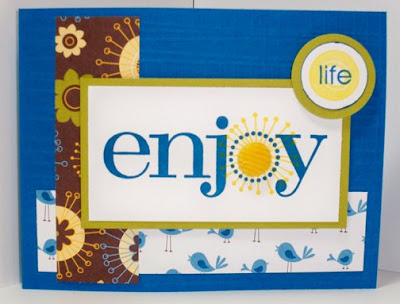
Base Layer: Cut a piece of cardstock in half at 5 1/2" and score at 4 1/4" to make your card base (or fold your base layer in half with your bone folder)

Second Layer: Cut a piece of cardstock at 4" and then at 5 1/4" Note: you can get 4 pieces from one computer sized piece of cardstock, or 6 pieces from a 12 x 12".

Layer 3: Cut a piece of cardstock first at 4" then at 2"
Layer 4: Cut a piece of cardstock at 4", then at 1 3/4"
(on both of these layers, if you are cutting from a 12x12" paper, you'll get 36 pieces from one sheet!)

Note: if you are going to scallop one side of layer 3 add 1/4", if you are going to scallop both sides, add 1/2". This will make room for what you cut off.

Next add your focal point. In this sketch we are showing a circle, but feel free to change it up and use any shape you like or any shape that fits your stamp! Take liberties and chances and above all please have fun!

Here are some idea's from the operators! Thanks for visiting and we hope you have time to play along. Wouldn't it be fun to find each one of these beauties in YOUR mailbox?


Thursday, June 25, 2009

Stampers Showcase for sketch 104

What a talented bunch! It was so difficult to decide which entries to pick for this week's submissions. Below are our operator picks for this week.

Saturday morning we will have another fun sketch to play along with and it will also be a "special" week, so make sure you check back and play along. You might win a fun prize!

We hope that you enjoy playing along. If you are having fun with the operators, please leave us a comment and let us know! :)


Saturday, June 20, 2009

Saturday Sketch Challenge ~ 104

Another Fun Sketch from your Stamping 411 Operators!

Although our operators take liberties with all the sketches (you should too), here are one set of measurements that might work for this layout.

Base layer: Take an 8 1/2" x 11" piece of cardstock and score it at 4 1/4". Turn your cardstock and cut it at 5 1/2". Now you have two card bases (and you only had to score once!)

Second layer: Is cut to 5 1/4" x 4". You can get 4 pieces out of one 8 1/2" x 11" sheet of cardstock.

Third Layer: 1" x 4" . Note: if you're using designer series paper, you cut first at 4" then at 1" intervals. If you're using a 12 x 12 sheet, you can get 36 from one sheet!

Fourth Layer: Might be more economical to cut from a 12 x 12" Cut at 4", then at 3", you can get 12 pieces from one piece of 12 x 12" piece!

Fifth layer: 2 3/4" x 3 3/4"

Embellish to taste and have some fun! Let's see what our operators came up with and please keep in mind that they all have more info for you on their blogs! (just click on the photos to go visiting and be sure to leave them a note to let them know you were there).


Gretchen Barron


Connie Babbert


Selene Kempton


Lee Conrey


Patti Chesky


Robin Merriman

Links are closed for this week. Please join us next week for a VERY special challenge. We will be giving away something very cool. Stay tuned!


Saturday Sketch Challenge Participants

1. Sharon Field
2. Sharon Carr
3. C@ro
4. Erna Logtenberg
5. Yapha
6. Erna Logtenberg
7. Joan Ottevanger
8. Jennifer Weide
9. Krista Visser-Driessen
10. Janelle Lavelle
11. Germaine Ferrao
12. Brenda Rose
13. Rachel Verbrugge
14. Cindy Rio
15. Beth R.
16. robynann
17. Karen Bernier
18. Joyce Wowczuk

New to posting?? Here's some directions about how to post your link so we can find your post!

After you post your card to your blog, click on the title of your post in your blog. The address you copy into Mr. Linky, should be to the post, like this:
http://inkspiredtreasures.com/challenges/a-study-in-gray/

Here' we can find Connie's post, but she's had 5 posts since last week, so if she only posted her blog address, ( http://inkspiredtreasures.com/ )we wouldn't be able to find her posts as easily. We ended up deleting a few links that didn't point to a card we could find. We couldn't find your creation!

Thursday, June 18, 2009

Sketch 103 Stampers Showcase

I'm really excited to bring you this week's showcase cards. I should share that we had some trouble finding some of your creations. So, below our showcase cards are some directions about posting your link. Thanks so much for playing along! We love going to see your awesome work! If you're interested in seeing these showcase cards, just click on the photo's to be transported to where the artist posted their creation! Enjoy!


After you post your card to your blog, click on the title of your post in your blog. The address you copy into Mr. Linky, should be to the post, like this:
http://inkspiredtreasures.com/challenges/a-study-in-gray/

Here' we can find Connie's post, but she's had 5 posts since last week, so if she only posted her blog address, ( http://inkspiredtreasures.com/ )we wouldn't be able to find her posts as easily. We ended up deleting a few links that didn't point to a card we could find. If your link was deleted in error, I'm sorry. We couldn't find your creation!

Thanks so much for visiting and playing! We will be posting our next sketch on Saturday morning!

The Operators

Tuesday, June 16, 2009

Video Tutorial: How to Tie a Classic Knot

I think one of the most frustrating things about stamping is getting your knots to look "just right". I made this video a while back and would like to share it here on Stamping 411.


When practicing your knots, I tell my customers to use Stampin' Up!s wide grosgrain ribbon. It's wide enough to help you understand what needs to happen to the knot to make it flat. If you do not own wide grosgrain, your next best choice would be the 1/4" grosgrain ribbon. The Taffeta and Organza ribbons are too soft and smooth to practice on. Once you get the technique down then start playing with all the other wonderful ribbons out there!!

Some helpful hints when tying knots (this is all mentioned in the video):
  • only pull one side at a time....this allows you to control the knot
  • cut a longer length ribbon than you really need when you practice...nothing is more frustrating than working with a too short piece of ribbon
  • use your index finger to slide the knot down into place

If you've found this video useful, please leave us a comment. We love to hear from you!!!

Happy Stamping everyone!!

Patti Chesky (Stamping 411 Operator)

Saturday, June 13, 2009

Saturday Sketch Challenge!

Happy Saturday! Hopefully the birds are singing and the sun is shining where you are!

Many of our designers, have done tutorials, given you step by step instructions on how they achieved the look for their card. Just click on the samples below to be transported to each artists post.

A note about our measurements, these are just a guide to help if you are new to card making. Feel free to take creative license and change the measurements to suit your tastes. This week we will talk a bit about how to get the most out of designer series paper, (specifically with layers 3 and 4). I hope you have time to play along. This sketch is super fun to work with.
So, let's get down to business! How to cut your paper...

Layer 1 (base): cut a piece of 8 1/2" x 11 paper in half so that it measures 5 1/2" x 8 1/2"
Quick Tip: if you score your card stock first at 4 1/4", then cut it, you will yield two card bases and only need to score your card stock once!
Layer 2(pink): cut a piece of paper at 5 1/4, then at 4" (you should get 4 pieces from one sheet for this layer)

Layer 3 (white): For this layer, many of our operators chose to use designer series paper. Cut a strip of dsp at 4", then cut that 4x12 sheet at 1" intervals. You can get 36" out of one sheet of dsp! How is that for economical??
Layer 4 (green): is similar. First cut your dsp at 3 1/2" then at 1".
Note: if you are only making one card, cut a 1" strip of dsp, then cut that at 4 adding 3 1/2". then you'll still have a piece of 12 x 11 DSP to play with!
For layers 5 & 6. Try measuring the block of wood from the stamp you're using and cut your layer 6 to that size. Layer 5 (which lays below it) would need to be either 1/8" or 1/4" inch larger to frame it (if you wish).

Layers 7 and 8: you can make this any shape you want, It doesn't have to be two layers.

We hope you have fun with this week's sketch and can't wait to see what you come up with! AND just for playing along, you could end up in our stamper's showcase. Please check out what last week's showcase members did. Their creations are beautiful! Mr Linky will close in the wee hours on Wednesday night!


Robin Merriman


Gretchen Barron


Connie Babbert


Selene Kempton


Lee Conrey


Patty Chesky


Saturday Sketch Challenge Participants
1. Robin
2. Karen Bernier
3. Tammy Howell
4. Angi Anderson
5. Cindy Rio
6. RobynAnn
7. Sharon Field / CreatedByU
8. Erna Logtenberg
9. Susan Shields
10. Joyce Wowczuk
11. Krista Visser-Driessen
12. Diana Eichfeld
13. Joan Ottevanger
14. jeanne nielsen
15. Karen Foltz (stampin3)
16. Beth Rhoden
17. Nancy Dawson
18. Sharon Carr

Powered by... Mister Linky's Magical Widgets.

Thursday, June 11, 2009

Stampers Showcase for sketch 102

We had a really hard time deciding which cards to showcase this week. They were all so beautiful! Thanks to all who played along! Just click the thumbnails below if you want to see the whole card. Here are a few of our favorites:


Thanks so much for playing along! See you on Saturday morning for the next great sketch from the operators!

Friday, June 5, 2009

Saturday Sketch Challenge

Are you ready for our second sketch challenge? In addition to learning to make simple and fun cards, play along this week and you might end up in Stamping 411's stampers showcase!

Inspiration can certainly come from anywhere. This sketch was thought of during breakfast. I shared this week where the idea for this sketch challenge came from with the operators, and everyone was laughing! Since it was a chuckle for all of them, we thought we should let you know where the idea came from! Yes, we're all making cereal boxes! More specifically, we're making cheerios boxes!

I also want to take a moment to let you know that if you follow the links to our "operator" blogs, you will find a host of tutorials and more detailed information about how each card was constructed. There is some amazing talent on this team and I hope that you check out all of the blogs if you have a moment or two. You may find some surprises out there!

Now, let's get down to the basics! One possible set of measurements might be listed as the following measurements. Please note our design operators, may have taken certain liberties outside these measurements and we encourage you to do the same. If you're new to stamping, or you just don't have the time to figure it out, here's some measurements that not only will save you time, but will help you to get the most out of your coveted Designer Series Paper (DSP).

Base Layer : Take a piece of regular "computer sized" paper and cut it in half at 5 1/2". Fold this same layer in half at 4 1/4", To get a nice crisp fold, you can either score the cardstock first, or use a bone folder to smooth the line.
Second Layer: Cut your cardstock to 5 1/4" x 4" (if you are using designer series paper, (which is 12 x 12) and you cut your paper at 5 1/4" first, You will get 6 second layers out of one sheet of DSP.
Third Layer: is 1" x 4" This time, if you are using DSP, you would cut on the 4" marker first. If you use an entire sheet of DSP, you can get 36 pieces out of one sheet! That's so amazing!
Focal point: A wise designer (or two) once told me, to get the right measurement for your focal point, measure the block of wood for your stamp and cut it to that! Whatever you use to "matte" your focal point, should be 1/4" larger on two sides. So if your wood block is 2"x3", your matte would be 2 1/4" x 3 1/4". That should make putting this simple sketch together as easy as 1~2~3~

The operators are waiting excitedly in the wings, waiting to see some more awesome creations this week! Thanks so much for visiting and for playing along!


Saturday Sketch Challenge Participants
1. Cindy Rio
2. Tracy
3. SHERRI
4. Janice Rosenthal Rock
5. Barbara Joyce
6. Erna Logtenberg
7. Elizabeth M. Harris
8. Krista Visser-Driessen
9. Tami Black
10. Janice Webb (Aloha Jan)
11. Janice Webb (Aloha Jan)
12. Sharon Maranich
13. Susan Shields
14. Zigzag
15. Diana Eichfeld
16. Joan Ottevanger
17. Germaine Ferrao
18. Tiffany Bauer
19. Germain Ferraco
20. Karen Bernier
21. Deb
22. Monika Davis
23. robynann
24. ~Andrea Thompson~

Powered by... Mister Linky's Magical Widgets.

Thursday, June 4, 2009

Blog Candy Winner and Showcase Cards

What a wonderful week! The launch of our new blog and we had 21 AMAZING entries! Every single card was fabulous! I will say, this morning, when we went to pick our top 5, we had some trouble finding some of your entries. When you link back to our blog, please make sure that you link to the post, and not just your blog, or we may not be able to find your wonderful work!

Once we found them all, then we had the difficult task of choosing (and agreeing) on five cards that we love! Here are the operator's picks for our First Stampers Showcase. To visit that person's site and leave them some love (a comment) just click on the thumbnails below.


And Now!!! The moment you've all been asking about! Show me the candy! We chose this winner by random number selection! So, BARBARA JOYCE, come on down! You have just won a Stampin' Up! level 3 hostess set, Goody Goody Gumdrops! Just send an email to the operators at asktheoperators@e-selene.com.

Thanks for playing along with the operators and we look forward to seeing what you come up with using our next sketch, on Saturday Morning!

Also, please keep your eyes peeled for some amazing new tutorials that are in the works. The best part of this group is the teamwork! We are working together to bring you all we know about new stamper topics that will be easy to find, use and reproduce! Stay tuned!