Friday, February 25, 2011

Saturday Sketch Challenge 192

Good evening friends and welcome to a new sketch from the Stamping 411 Operators!

This is such a versatile sketch that you can turn to over & over for many different projects! Check out Tiffany's clever use of the sketch to create a fabulous 3d item!! We would love to see what it inspires you to come up with!

Potential measurements for your card could be:
  • Base 11 x 4 1/4", scored and folded in half at 5 1/2"
  • Layer 1: 5 1/4 x 4"
  • Layer 2: 3 1/4 x 3 3/4"
  • Layer 3: 3 x 3 1/2"
  • Layer 4: 1/2 x 1 1/2"
  • Layer 5: 1/4 x 1 1/4"
  • Layer 6: 1" circle, or embellishment of your choice
Here's what the Operators have come up with this week, we hope you enjoy checking out our creations, and we'd love for you to play along!

Selene Kempton


Connie Babbert


Lee Conrey


Patti Chesky


Gretchen Barron

Now it's your turn :D Never played with us before?? Well, it's easy! Sky's the limit!
  1. Make a card
  2. Post it online somewhere to your blog or other online forum
  3. Post a link to the free linky tool below (please point the link to your post and NOT just your blog)
  4. Have some fun and leave comments for each other (and for the operators if you like their work). ~ Everyone loves comments!
We hope you join us this week and play along with this sketch! But don't delay our links will close at 8AM on Thursday morning Eastern Standard Time.

Have A Great Week!
-Kerin

Stamper's Showcase #191


Everyone must be thinking spring these days! Look at all the beautiful flowers and spring images that you put into your Stamping 411 cards this past week! Just fabulous! Here are your Operator Picks for Saturday Sketch Challenge #191.

Thursday, February 24, 2011

Color Inspiration #151


I don't know what it is this week, but I've been having a blast exploring the Brights Color Collection. Secretly, I think it's my desire for Spring to just get here already. I know many of you feel the same way......it's been a wild and crazy winter.

The color challenge for this week is Tempting Turquoise, Rich Razzleberry, Daffodil Delight and Pumpkin Pie.


As I was blog hopping this morning, I came across a Jessica Luther's tutorial for a funky fold card. It was just what I needed as my Just Cards class is being held this week......and I needed a funky fold design. Now that I knew what kind of card I wanted to make, I needed to design the theme of my card. Butterflies seemed the perfect choice. A butterfly makes a transformation from something not so pretty (at this point, how I feel about Winter) to something spectacular (my anticipation of Spring).

I've shared my project using these bright and beautiful colors. Now, it's your turn. We'd love to see what you make with this week's color challenge.

I've added the Linky Tool to the bottom of this post so you can copy the web address of your project to link to our blog.


Card Recipe

stamps: Inspired by Nature, Flight of the Butterfly
paper: Tempting Turquoise, Daffodil Delight, Rich Razzleberry, Pumpkin Pie, Whisper White
ink: Old Olive, Rich Razzleberry
accessories: Scallop Edge border punch, Scallop Square Clear Bigz die, silver brads, Rich Razzleberry Satin Ribbon, Square Lattice embossing folder, Small Oval punch, Basic Rhinestones

Friday, February 18, 2011

Saturday Sketch Challenge 191

Good Evening Friends!

I'm very excited about tonight's sketch, and some of the samples below we have to share... but first I have some things to share with you...

McLinky has been experiencing some technical issues and we believe that those issues are over. If for some reason you want to play and linky is down, feel free to pop me an email @ e.selene@verizon.net

Next, we have some important news from our operator Robin.

Robin shares:
"A Note from Robin

I'm about to ask kind of a silly question, because I feel pretty sure I know what your answer would be. But here goes anyway - "Have you ever walked away from something you love because you knew it was the best thing for you to do?" Mmm, hmm. I thought so. Most of us have had to make hard choices from time to time so you know how it feels. Well, this week, I had to make a very difficult decision and I've decided to step down from the Operator Team here at Stamping 411. I've been doing a bit of "life-rearranging" lately and in doing so, came to the realization that I needed to release a few things in order to restore balance for both my family and myself. A very wise friend once told me this, "Just because it's a good thing, doesn't mean that it's a good thing for YOU." Wise words indeed.

I've thoroughly enjoyed my time here at the 411 and have been blessed by so many of you who play along with us each week. Thank you for sharing your talents so freely with us here, you've inspired me many times and I am grateful to have 'met' you. To my fellow Operators, keep doing what you all do so brilliantly each and every week - create masterpieces from bits of cardstock, ribbon, glue and glitter. You are all amazingly talented, beautiful women and it's been an honor to work with you over the past two years.

Stamped blessings to you all,
~~Robin"

The operators and our readers will certainly miss you Robin. We are honored to be inspired by you as well. Stampin' Up's principals of putting family first and putting first things first are what comes to mind for me in this case. You are an awesome artist, team member and have contributed so much to the success of our joint effort to support the new stamper. We're wishing you the very best of success in all your endeavors. If you think of it, pop on over to Robin's blog and let her know you will miss her.

Well~ moving along to tonight's sketch... I really had a wonderful time making my creation and hope that you'll play along too! Tonight's sketch is pretty clean and simple..

Potential measurements for your card could be:
Base 11 x 4 1/4", scored and folded in half at 5 1/2"..
**TIP** did you know that when I make my base layer, I do the scoring first? That way when I cut my 8 1/2" x 11" paper in half I have two papers scored with one swipe!
Layer 2 5 1/4" x 4"
Maybe a ribbon or a 5 1/4 x 1/2" strip of paper for the ribbon element in the sketch?
Layer 3: 3 1/2" x 2 1/2"
Layer 4: 3 1/4" x 2 1/4"

Note ** layers 3 and 4 can be replaced by a shape.. only limited to your imagination. What shape would you use there? :D

For individual measurements, feel free to pop over to the individual operator blogs.. they will give you more information on how they made their creation.. I know they'd love to hear from you.

So ~ here's what the team has for you this week! Are you sure you're ready??

Prepare ~ to be amazed!! :D

Gretchen Barron


Kerin Sylvester


Tiffany Bauer


Selene Kempton


Connie Babbert


Lee Conrey


Patti Chesky

Now it's your turn :D Never played with us before?? Well, it's easy! Sky's the limit!
  1. Make a card
  2. Post it online somewhere to your blog or other online forum
  3. Post a link to the free linky tool below (please point the link to your post and NOT just your blog)
  4. Have some fun and leave comments for each other (and for the operators if you like their work). ~ Everyone loves comments!
We hope you join us this week and play along with this sketch! But don't delay our links will close at 8AM on Thursday morning Eastern Standard Time.

Have A Great Week!
Selene~

Stamper's Showcase #190


Great job, everyone, with last week's sketch! Thank you for your participation and enthusiasm. Here are your Operator Picks for Sketch Challenge #190. Keep up the fabulous work!

Thursday, February 17, 2011

Technique Thursday - Embossed Background

It's time for another installment of Technique Thursday, and this week I've got a very easy technique, sure to give a simple card a bit of a "wow" factor! I don't know about you, but I find it hard to believe we ever lived without the Big Shot, and embossing folders!! Today I'm going to show you how you can add dimension to your cards with any punches and Big Shot dies you've got on hand, you're not limited to what folders you've got!

Here are the two cards I came up with:How do you like the backgrounds for these two cards? This was so simple, this is how I did it:

First, punch the shapes you'd like embossed into your background. For the top card I used the Island Floral die, for the cupcake card I used the cupcake punch.

**Tip - use something a little thicker than card stock to punch your shapes. I used the backing of a package of dsp. The thicker the material you use for your punched shapes, the greater impression they will make in your card stock.

Next, arrange them on your card stock or dsp as desired. Use Dotto (temporary adhesive) to hold them in place.Once you've got them arranged, flip this piece of paper over, so that the punched shapes are against your cutting plate, like this:

Next add the rest of your "sandwich", which will be the Silicone Rubber pad, and the Texturz Impressions Pad on top.

Run this through the Big Shot, and when it comes out, peel off the punched shapes that were temporarily adhered to the dsp or card stock. Voila! You're read to use your embossed paper on a project!

If you'd like to give this technique a try, we'd love to see what you come up with! Just link your creation below:

Wednesday, February 16, 2011

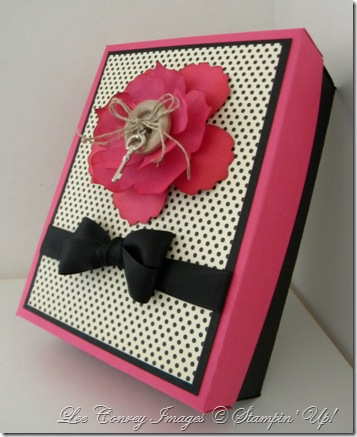
"How To" Build a Card Box

Hi Everyone,

Toady I’m going to share a “How To” make a Card Box for all the lovely cards you make. Ever think about making sets and giving them as Gifts? Well now you can ……this is how

How to Build a Card Box 018

Supplies needed:

Card Stock

Paper Cutter and Scoring Blade

Bone Folder

Sticky Strip

Designer Series Paper and any embellishments you may like.

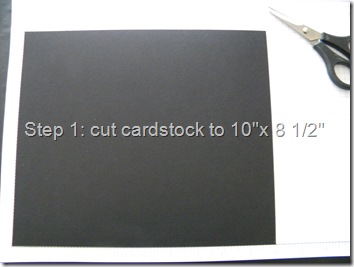
1-Cut Card Stock to 10 x 81/2

How to Build a Card Box 002

2-Score at 2” on all 4 sides

How to Build a Card Box 003

3- Cut across the tabs with your paper snips to create a more finished box.

How to Build a Card Box 004

4-Cut up to score lines

How to Build a Card Box 005

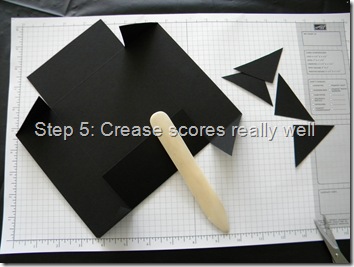
5- Score really well with your bone folder. It really helps make a neat box to have nice crisp and creased lines. Whooo…say that fast five time!!!

How to Build a Card Box 006

6- Add Sticky Strip where indicated (close to the score line so there are no gaps)

How to Build a Card Box 007

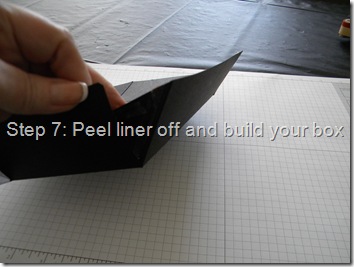
7-Peel off Sticky Strip and build your corners.

How to Build a Card Box 008

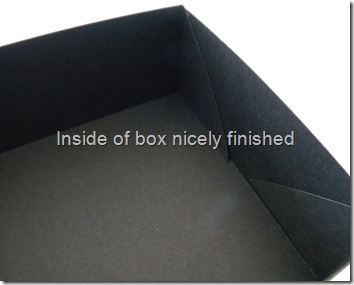
See how nice the inside looks!

How to Build a Card Box 009

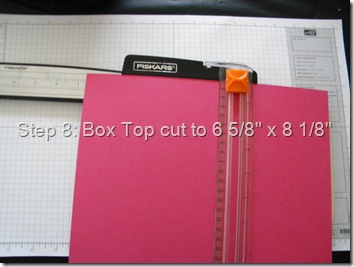
8- Cut the top of the box at 6 5/8 x 8 1/8

How to Build a Card Box 010

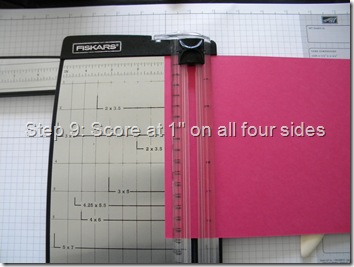
9- Score box top on all four sides at 1 inch

How to Build a Card Box 012

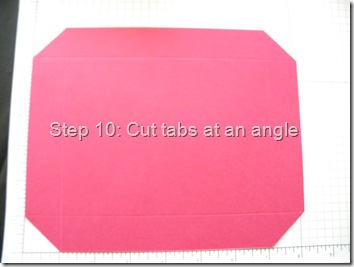
10- Cut tabs at an angle with your snips, same as the bottom fo the box

How to Build a Card Box 013

11: Add Sticky Strip and a glue dot as the little corners are so little (it’s just easier)…then build your top.

How to Build a Card Box 014

12-I made a black mat measuring 4 1/4 x 5 3/4 and used a piece of DSP measuring 4 x 5 1/2 and taped together.

How to Build a Card Box 015

Add to the top of your box. I tied a double bow using Black Satin Ribbon and taped to the back of the mat before sticking it down.

How to Build a Card Box 016

I had an extra flower made in Melon Mambo using our new Fun Flower Die and attached it with Glue Dots.

How to Build a Card Box 018

So that’s it!!! Let me know if you liked it!

Now to figure out what to make to put in the inside. Obviously a pretty set of note cards for someone…..back to the drawing board!! By the way…this box will hold 8-12 cards and Envelopes easily!

Have a wonderful Day Everyone!!!

Friday, February 11, 2011

Saturday Sketch Challenge #190

Hello everyone and welcome to a new Saturday Sketch Challenge from the Stamping 411 Operators!

Here's our sketch for this week ...

As you can see, you've got a good sized space for your focal image and sentiment. And don't forget the ribbon treatment!

Here is one possibility for measurements for this card:


  1. Layer One -- Cardbase -- Cardstock cut at 5.5 x 8.5", scored and folded
  2. Layer Two -- 4 x 5.25"
  3. Layer Three - 1.5 x 4.5"
  4. Layer Four -- 1.25 x 4.25"
  5. Layer Five -- 2.5 x 3.5"
  6. Layer Six -- 2.25 x 3.25"

We hope you'll want to play along with this week's sketch challenge. We've got some beautiful projects from the Stamping 411 Operators to inspire you and get your creative juices flowing.


Here you go ...


Gretchen Barron


Kerin Sylvester


Tiffany Bauer


Selene Kempton


Connie Babbert


Lee Conrey


Patti Chesky


Are you inspired? We hope so! Now, get busy creating your own interpretation of this sketch. And when you get it done, come back and leave your link below! It's easy to do -- take photos, post them on your blog or other public forum, and then click on the link below and follow the directions below. We hope that we'll soon be enjoying your beautiful artwork! You have until Thursday morning at 5 AM (Eastern Time) to leave your link!

Have a great weekend and Happy stamping!